The Super Surfer Vaporizer V2 is the world’s most versatile desktop vaporizer setting the benchmark in desktop vaporizers.
It can be used with a whip set-up, a bag set-up, an aroma top, as an e-nail, and a variety of filtration and cooling accessories.
When you first plug in the Super Surfer V2 for your first use, turn the heat (left dial) on high for about 5 minutes to burn off any residue from the production process. After 5 minutes, turn the knob back down to about the 3 or 4 o’clock position (just right of center or about 1/4 on) to begin vaporizing.
CAUTION: The heating element & surrounding glass can get VERY HOT!
Super Surfer V2 Quick Instruction Video

Super Surfer V2 FULL Instruction Video

Click To See What Is In The Bag
Assembling The Whip And The Vapor Bag
Click For Super Surfer Version 2 Instruction PDF
Warranty Info and Vehicle Registration
How the Super Surfer Works
Unlike pipes, the vaporizer allows you to inhale herbs without combustion essentially doubling your active ingredients as combustion can destroy up to 60% of the active compounds. The Super Surfer uses hot air to heat the herbs until the active ingredients boil, vaporize, then are suspended in the air. Instead of burning ingredients out of the herbs, the Super releases the materials contained in the herbs with no burning and without producing the odors and associated waste products produced by smoking. Many people will eat the leftover herbs that have been vaped as they still contain active herb compounds.
The Super's heater element can be left on for an extended period of time as long as it is supervised. We recommend turning off the fan when not in active use.
Using The Super Surfer Whip Set Up
The glass wand or vapor bag bowl can be packed with about 1/2 inch of herbs, or just at the frosted line on the bowls. When the packed wand is placed against the Super’s glass heater cover and the user inhales, a vaporous mist is ingested. When the Vapor Bag Bowl is connected to the heater cover and the fan is turned all the way on, the vaporous mist fills the bag and becomes much more concentrated. The mist is easy on the lungs because the user isn’t inhaling smoke or any of the other nasty byproducts of combustion – a feature ex-smokers will greatly appreciate.
First Time Use
When you plug in the Super Surfer for your first use, turn the heat (left dial) on high - turn all the way clockwise - for about 5 minutes to burn off any possible residue from the production process. After 5 minutes, turn the knob back down to about the 1 or 2 o’clock position (just right of center) to begin vaporizing.
After The First Use, Find Your Sweet Spot
You will now find your sweet spots for both the whip set up and forced air set up. Note that these will be two different temperatures. The whip setup will need to run hotter than the fan setup due to the fact the fan moves air slower than you inhale, as well as the fan, is a constant draw.
- Turn on the Super Surfer to about 1/4 temperature by rotating the front heat knob clockwise and let the unit warm up for two minutes.
- The ceramic heating element will glow orange, but the glass heater cover also needs to absorb the heat. Meanwhile, prepare and pack the herbs. You may find that this temperature is too low.
- If this is the case you will want to turn your heat setting up by about 1-hour worth on an analog clock and wait about 1-2 minutes for the heater and glass to get to temperature.
- You will repeat this until you find your whip sweet spot
- Remember your spot and leave it there if you like, or when you are ready to vape again, turn it to your sweet spot and wait about 2 minutes.
Preparing The Herbs
Break up or grind your herbs with a grinder, scissors, or your fingers – just make certain the herbs is broken up and fluffy. We recommend only filling to about just under the frosted line. You can fill higher but this can lead to potentially overheating your herbs. If you do this, just watch you inhale to make sure you do not overheat your herbs and combust them. Once you find what you like, you will fully have your unit adjusted to your liking.
Assembling The Whip And The Vapor Bag
Vapor Bag Set-up:
- Attach your Whip Mouthpiece and Whip Wand with Bowl to the tubing. The whip can be used manually, or you can attach it to the glass heater cover with the hands-free attachment for hands-free use.
Vapor Bag Set-up:
- Close off Bag. Cut a length of the bag (18” to 22” is typical) and seal one end by twisting & folding it over, then sliding it through the Vapor Bag Seal.
- Attach Sleeve to Bag. Slide the pinched end of the Vapor Bag Sleeve over the open end of the bag until about 1-2 inches of the bag extends outside the other end of the tube.
- Attach Bag to Wand. Push the tapered end of the Vapor Bag Wand into the bag until the sleeve starts to tighten.
- Seal off Bag and Wand. Cut along the edge of the sleeve to remove the excess bag. Then pull the main portion of the bag while pushing in the wand for a tight seal and clean look.
Packing The Wand Or The Vapor Bag Bowl
Loosely cover the screen with about 1/4th to 1/2 inch of herbs. It’s important to not pack too tightly so the heat flows through the bowl evenly. As you gain experience with the Super, you’ll learn that a little bit goes a long way. Never fill the bowl area past the clear glass and into the ground glass, as it could very easily fall into the vaporizer.
As you vape you’ll need to stir occasionally to ensure the herbs are vaporized evenly.
Using the Vapor Bag
Note: a Sick Clip is included for those who wish to secure the Bag Wand to the Bag Bowl and/or the Bag Wand to the mouthpiece.
Once your bag is full, keep the fan on while separating the wand from the Vapor Bag Bowl to prevent blow-back. Never remove the bowl first, as this can also cause blow-back from the change in pressure. Attach the Vapor Bag Mouthpiece onto the ground joint of the wand and clip it in place with the Sick Clip. Take a deep breath and enjoy!
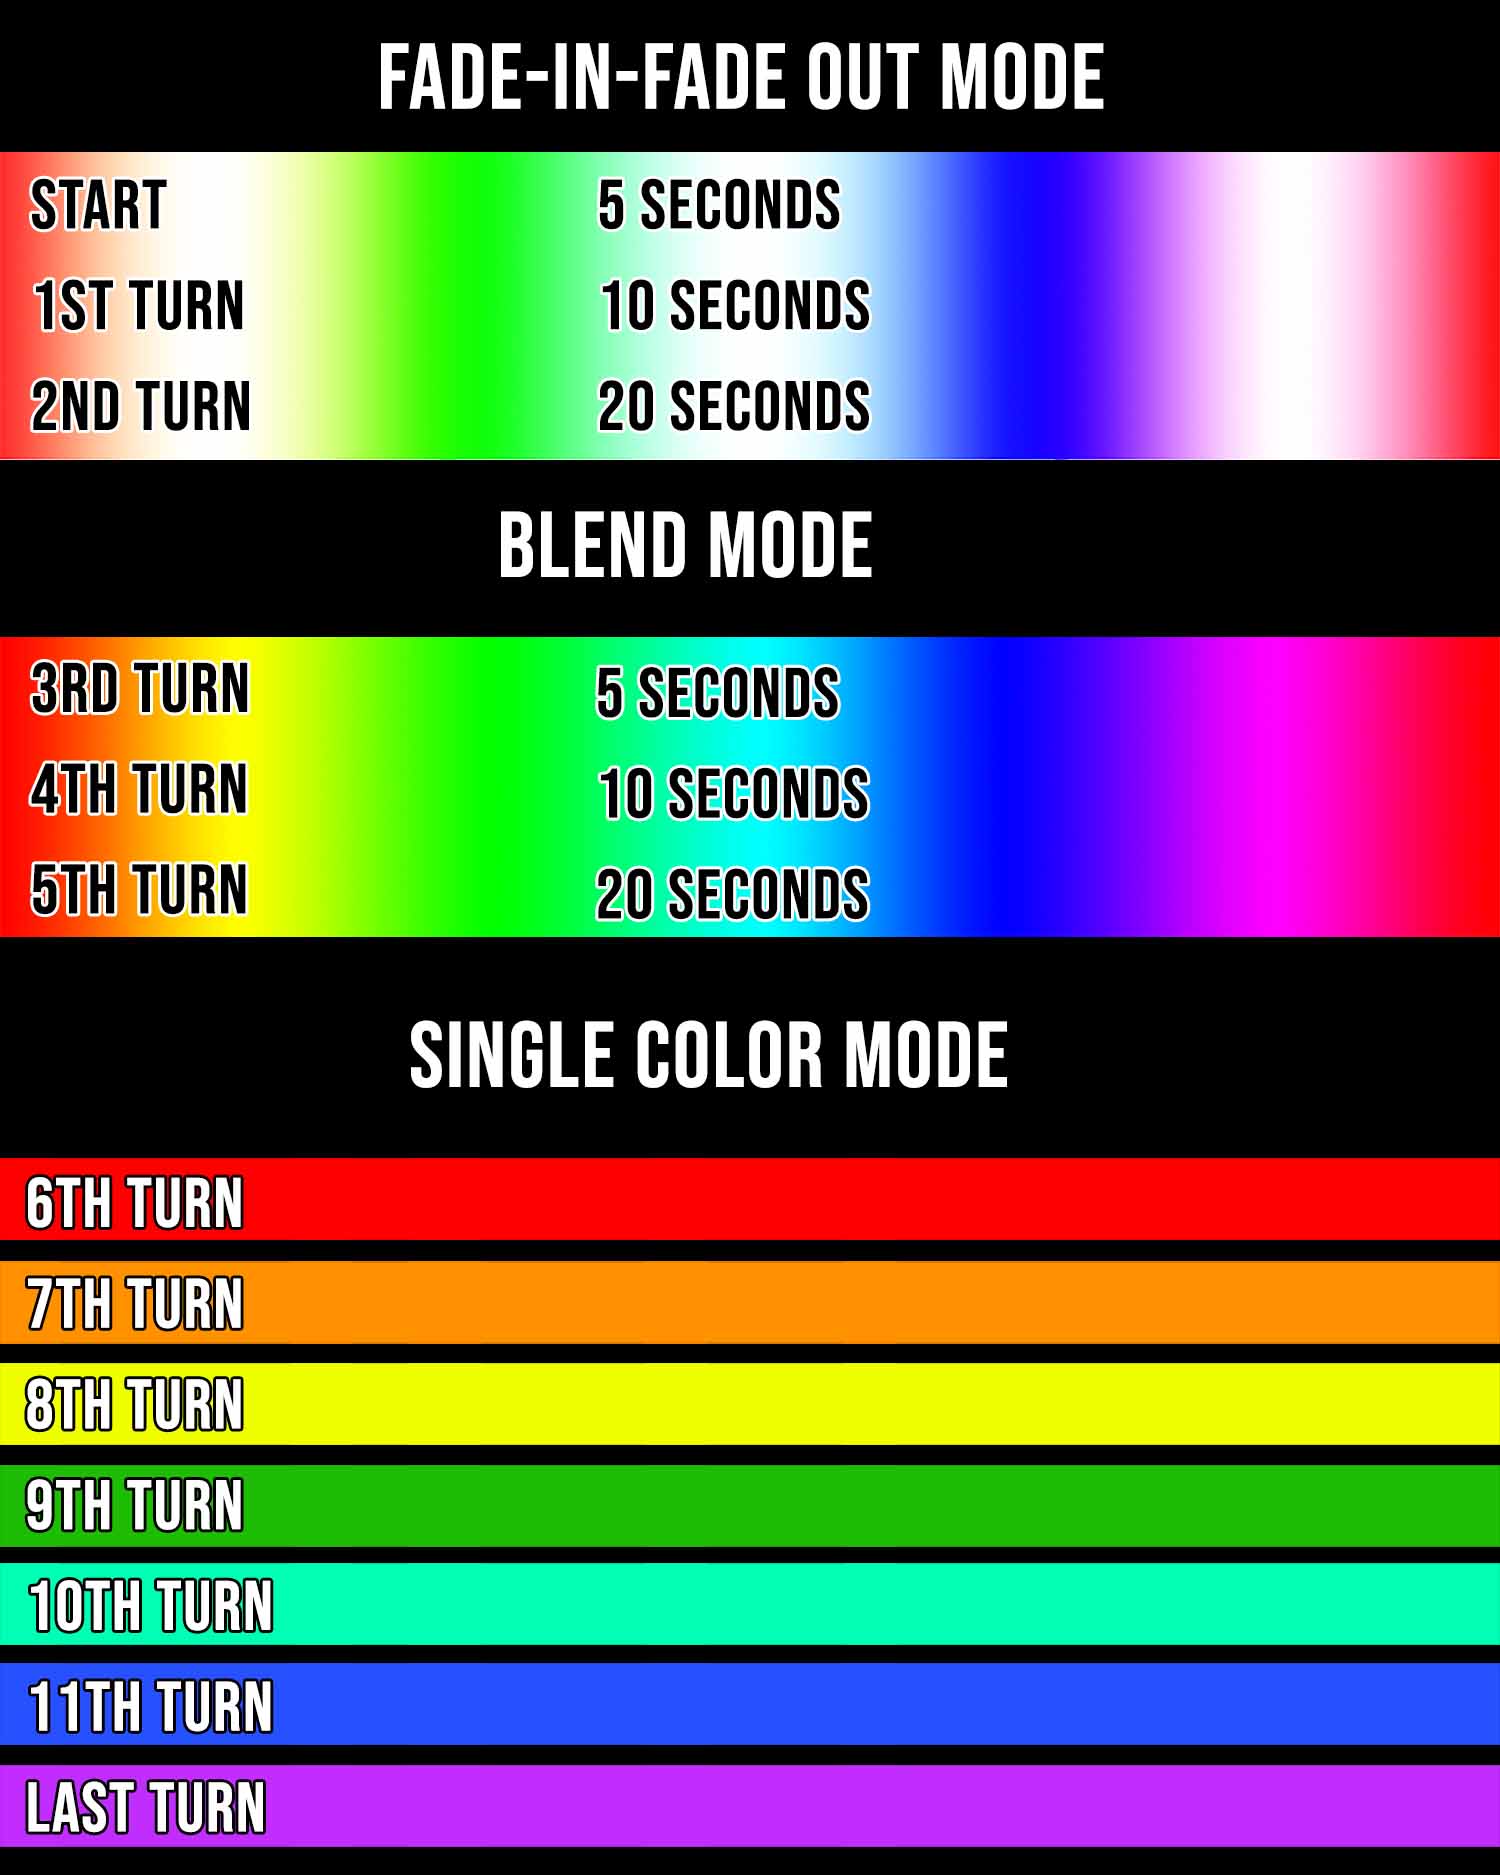
Changing the Light Setting
- Press the light knob down. This turns the lights on and off.
- Your unit starts out in the first mode of (Fade-In-Out) at 5 seconds. The pattern below represents how the lights turn on and off. It takes 5 seconds for the light to turn on, then 5 seconds to turn off. The pattern follows the rainbow from color to color.
- The 4th setting is the first of the blend modes starting at 5 seconds. This mode is where the first color takes 5 seconds to turn on, then the next color turns on for 5 seconds, then the prior color turns off for 5 seconds, and then turns to another for 5 seconds following the rainbow.
- The 6 setting is where the solids start. Each turn after this is a new solid color.
- To get to the start of the lights turn the light knob all the way counter-clockwise until you see red. This is the beginning of the sequence. To get to the end just turn the knob clockwise until you see purple. Have fun!
Fill the Vapor Bag Bowl with about 1/4 to ½ inch of ground herbs, and connect it to the Vapor Bag Wand - you can use the optional clip if you want. You can then manually hold the Vapor Bag Bowl to the Glass heater cover of the Super Surfer or attach it with the Hands-Free Attachment. Set the heat (glass knob) to the sweet spot, then turn the fan (right dial) all the way up until the bag is completely full. Keep the fan on while removing the filled bag, or close your valve to prevent blow-back. You can experiment with different heat and fan settings to produce the desired amount of vapor. Just remember to start our lower and work it up. This will only take a time or two to find your sweet spot
WARNING! Failure to follow safety recommendations could result in serious injury or property damage.
- During operation, Super Surfer Herbal Vaporizer components get sufficiently hot to cause combustion and severe burns! Never touch the ceramic heater, glass heater cover, hands-free attachment, or other surfaces inside the Super once powered on. Always allow a cool-down before touching any Super components after turning the device off.
- Keep the Super out of reach of children and away from pets. Never leave unattended with a child in the vicinity.
- Keep the Super away from combustibles such as paper, fabric, plastic, and anything else you think could catch fire.
- Never let hair or loose clothing come in contact with the heat source.
- Pay attention to power cord placement, and never put the Super where it could be tipped or could fall over.
- Never leave the Aroma Top on the Super when it could be tipped or knocked over. Hot oil can burn and stain.
Changing the Screen
With use, the screens will become clogged and will require occasional replacement. The first time you replace a screen it might take a bit longer, but soon you'll get the hang of it and be changing screens in seconds. Before beginning, you might wish to see a short video of the screen-replacement procedure:
Remove existing screen
Using the supplied pick, reach into the tube and hook the screen, then pull it upward from its seated position inside the bowl. Or, use a longer rod to push the screen out from the opposite end.
Install Replacement Screen
- Cup the screen by pressing it into your palm with a finger. Place the screen against the interior wall.
- Press the tip of the pick against the screen and use the pick to push the screen into the tube toward the bulge of the bowl.
- When the screen is positioned at the bulge, use the pick to flip the screen away from the wall and pop it into the bulge. When the screen is flipped, part of the screen pops into the bulge.
- Use the pick to press the screen's perimeter to finish popping the screen into the basket.
Hands-Free Attachment
Mate the Whip Spherical Wand or Vapor Bag Bowl to the heater cover.
Slide the Hands Free Attachment around the wand or Vapor Bag Bowl, inside the housing. It should be snug but still allow movement.

Glass Aroma Top
Top off your vape with a glass Aroma Top! Add a few wax melts or essential oils to fill your home with a wonderful, clean scent. Mix and match wax melts for a custom aroma of your very own!
(*note: does not work with Hands-Free Attachment in place)

Heater Cover Info
If you need to clean or remove your heater cover for any reason, unplug your Super Surfer Vaporizer and let it cool for AT LEAST 30 minutes before attempting to touch the heater cover. After 30 minutes, hold your hand directly above the unit and feel for any heat still emanating from it. If you still feel the heat, wait an additional 30 minutes or until you are completely sure the unit is cool enough to touch.
Changing/Cleaning your HC
Whether you want to remove your heater cover for transit or clean it after extensive use, we have made the process simple! With our current heater stand, it's just a matter of pulling up on the (COMPLETELY COOLED!) heater cover. A ‘slight’ side-to-side motion might be necessary, but if you feel any resistance at all, do not force it! You are putting force on the glass, and too much could break it and cause injury.
To clean your heater cover, use a mild soap and water combo. For stubborn build-up, we suggest soaking in Isopropyl alcohol and removing the buildup with a pipe cleaner or Q-Tip.
Swapping and installing a new base
Swapping the base on your Super Surfer desktop vaporizer is fairly easy. You will need 1 Philips screw driver #2 tip to perform the task. This is the most standard tip, so you will more than likely be fine with what you have. Watch Steve as he goes the the base swap.

What's In The Bag
- Super Surfer Vaporizer assembled with two hand-blown glass knobs and a Spherical Glass Heater Cover
- Padded hand-made storage bag made of a hemp and polyester blend we like to call "hempster"
- Roll of food-grade plastic Vapor Bags
- Glass Aroma Top scented oil and wax melt diffuser
- Replacement Screens for the Whip Wand and the Vapor Bag Bowl
- Vapor Bag Mouthpiece
- Vapor Bag Bowl
- Vapor Bag Wand
- Vapor Bag ValveVapor Bag Seal
- 2 silicon seals
- 1 valve wand
- glass valve stem (19mm part)
- Whip Mouthpiece
- Vapor Bag Sleeve
- Whip Wand with Bowl
- Whip Tubing made of food-grade vinyl
- Stainless Steel Pick to stir your herbs or replace the screens
- Hands-Free Attachment to secure the Whip Wand or Vapor Bag Bowl to the heater cover
- Sick Clip to seal and secure ground glass connections
- Ceramic Flavor Discs for vaporizing essential oils and concentrates
TIPS & HINTS
- We recommend that you start with a low temperature, to begin with, and if you do not see vapor, turn it up slightly; wait 30 seconds and try again, If you still see no vapors, repeat until vapors are visible on exhale.
- When putting together your bag set-up, be careful that the wand does not poke through the bag as you are sliding it into the vapor bag sleeve. Additionally, the wand can sometimes not create a tight enough seal with the bag and sleeve, so you may need to twist the wand while putting it into the vapor bag sleeve.
- If the flow seems restricted, make sure the herbs are not packed too tightly in the wand. Stir with the included pick to loosen.
- Screens can become clogged over time, causing issues with airflow, Clean or replace your screen regularly to maintain proper airflow.
- Filling a Vapor Bag causes the vapor to be far more concentrated than it would be when using the whip, so be careful and take slower hits until you experience how the difference will affect you.
- Your personal rate of the draw as you inhale through the whip can control the temperature slightly. Drawing faster causes the air to move quickly over the heating element, so it has less time to heat up. Drawing slower has the opposite effect. If you find combustion occurring, either turn down your temperature or draw slightly faster. Conversely, if you do not feel you are reaching vaporization, either turn up the temperature slightly or draw slower.
- In no time you will find your ‘sweet spot’ that will allow you to draw at a comfortable rate while still achieving thick and tasty vapors!
Warranty & Service
Click here to view the complete warranty details.
Register Your Super Surfer Vehicle to Start the Warranty Period:
Your Super Surfer Vehicle must be registered within 30 days of purchase to enact the warranty.