The SideKick Portable Vaporizer is the world’s most easy to use portable vaporizer.
Control any aspect of it with just the push of your thumb.
When you first receive your SideKick, charge the battery until the LED light on the charger goes to a solid 3 bars.
Pop it into the bottom of your SideKick with the positive end up.
CAUTION: The heating chamber and surrounding metal can get VERY HOT!
Sidekick Portable Vehicle Instruction Video:

Click To See What Is In The Bag
Using the SideKick
Cleaning the SideKick
Changing the Screen
Warranty
How the SideKick Portable Vehicle Works
Unlike pipes, a vaporizer allows you to inhale herbs without combustion. This means you get more active ingredients because up to 60% can be lost when burned. The SideKick Portable Vehicle uses both conduction and convection to heat the herbs.
It heats the herbs until the active ingredients boil, vaporize, then are suspended in the air. Unlike smoking, the SideKick doesn't burn the ingredients. This means no bad smells and no waste.
Many people eat the leftover herbs after vaping. They still have active herb compounds.
Using The SideKick Portable Vehicle
Charge the Battery
Your SideKick Portable Vaporizer comes with an 18650 battery (or two 18350 batteries if you have the Sidekick V1). The battery comes partially charged, but it is highly recommended that they are charged to full capacity before first use. Plug your charger into the wall and then put the battery in with the positive end facing the logo. The LED light will go from flashing bars to full solid 3 bars when fully charged. The charger is made to fit multiple sizes of batteries, but only one battery per slot can be charged at a time.
Insert the Battery
With a fully charged battery, open your SideKick’s battery compartment by sliding the lock on the bottom plate towards the logo. Pull the plate up and away from the side. With the SideKick upside down put the batteries in so the button on the positive end is facing up. This positive end of the battery must touch the battery cover plate. Your SK will not work with the battery in the wrong way. Now put the cover back on by sliding the small lip into the notch opposite the battery compartment. Press the lid down.
Prepare The Herbs
Grind your herbs with a grinder, scissors, or your fingers – just make certain the herbs are broken up and fluffy so the air passes evenly through. We love the grinders as they grind to a preferred size
Pack The Bowl
Start by grabbing the top lid and pulling it up at a 45-degree angle. Make sure the white dot on the gear is facing out. This means the stir tool is ready for removal.
Next, load your bowl with your favorite ground herbs to about the middle of the silicone. Pack the herbs gently but not too tightly. Leave some room for stirring and allowing the herbs to move.
To put the lid back on, make sure the gear tool is turned away from the mouthpiece. This is shown in the video. The white mark on the gear shows it's in the right place. Hold the lid at a 45-degree angle and set the notchback in the hole.
Then, set the lid back in place at the same angle. You'll feel the magnets grab.
Powering On/Off
Turn the SideKick on by pressing and holding the power button for 5 seconds. The SideKick logo will light up as it boots up. A few seconds later, the main control screen will appear.
Turning the Sidekick off is just as easy. Press the power button for 5 seconds. The SideKick automatically turns off after 7 minutes to save battery power. It also turns off if you forget to do it yourself!
Inserting and using the Mouthpiece
Your SideKick comes without the mouthpiece inserted. Coconut Oil is the best oil to use. It makes the silicon mouthpiece very slick after a few days.
Open the small container of coconut oil and add a small amount to the mouthpiece. Twist, push, and pull to coat the silicon well. Repeat as needed. If the container seems empty, warm it in your hand or in the microwave for 7 seconds.
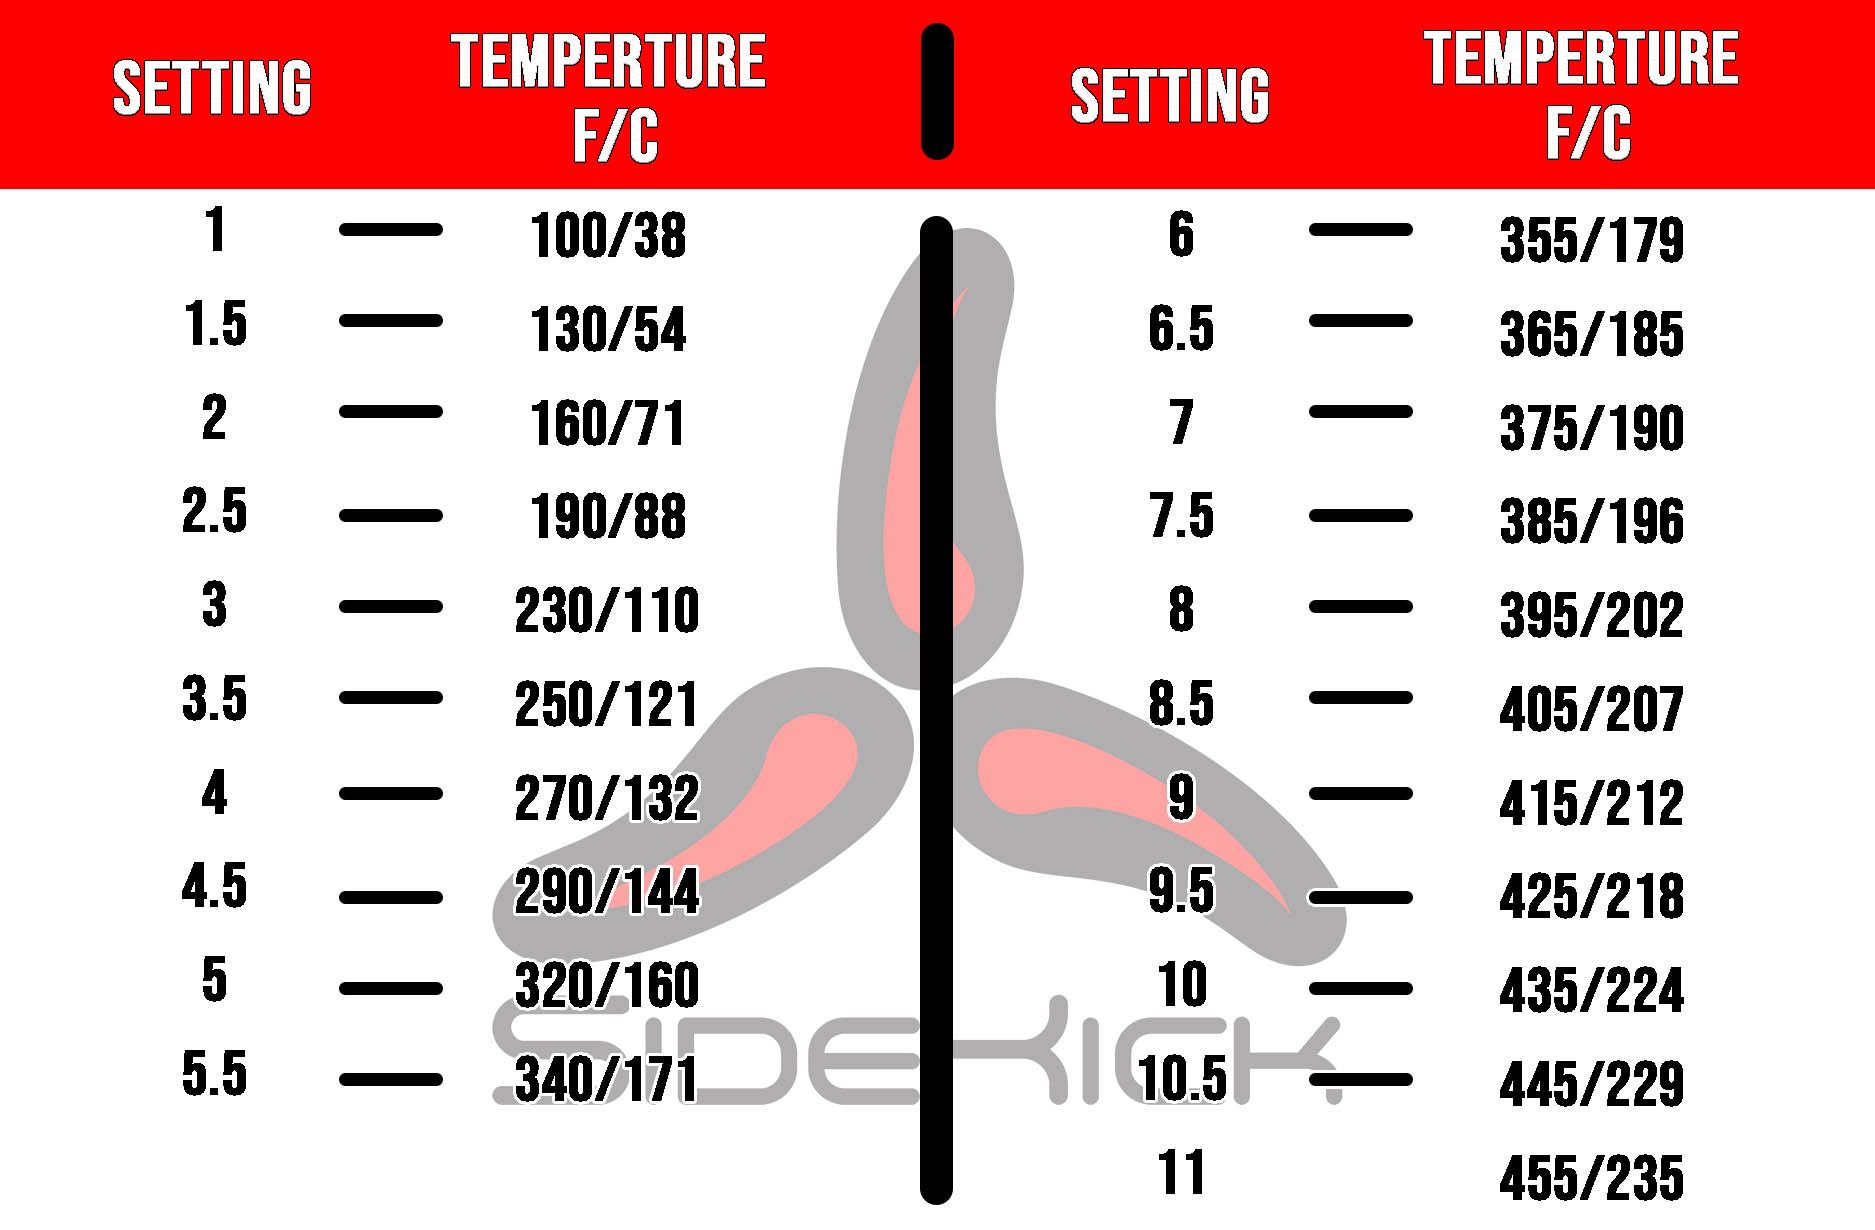
Selecting The Heat Setting
The SideKick Vaporizer has 21 points of temperature control, from 248° F to 455° F. Press the up or down button to choose your setting. Press the power button once to start heating.
The unit will vibrate when it reaches the set temperature. The LCD screen shows the battery life, voltage, and vaping time. Settings 6.5-8 are best for herbs.
Inhale And Stir
Pull up on the mouthpiece to adjust your air pathway and find the length that is most comfortable for you. In addition, we have made the act of stirring your bowl throughout your vape session totally effortless by creating a stirring mechanism that works with just the push of your thumb. Just spin the gear forward or backward and you are stirring the herbs in the bowl. The SideKick uses a hybrid conduction/convection heating system for the best battery efficiency, but that also means it is always cooking your herbs when the heater is turned on and up to temperature. To vape your herbs evenly and achieve the best flavor, stir the bowl slowly whenever you are not inhaling to prevent the herbs from cooking too much and to allow air to flow through the herbs evenly. You can also stir the bowl while you are inhaling, it all works well. We have found that after 3-4 hits, it is good to take the lid off and and put it back on. Then tamp the SideKick lightly into your palm to keep the vapor thick.
Vortex Cooler
The SideKick's vortex cooler design and pull out glass mouthpiece extend the vapor path to be nearly 11 inches away from the bowl, while spinning the vapor in a vortex fashion helps cool the vapor essence. The vortex cooler also acts as a secondary filter for when you are vaping dry herbs. The SideKick portable vaporizer comes with the vortex cooling device inserted into air path tube #1. To access your vapor path, remove the battery cover and the silicon vapor path connector, opening up both air path tubes. Looking at the bottom with batteries on the left, we will call the tube all the way to the left cooling tube #1, and the tube to the right, cooling tube #2. You can remove the vortex cooling device from tube #1 to reduce air restriction. You can also remove the vortex cooling device and freeze it. After about 30 minutes in your freezer, you can replace it back into your SideKick and enjoy a Rocky Mountain cool vapor experience. This experience will last for about 1-2 bowls.
WARNING! Failure to follow safety recommendations could result in serious injury or property damage.
• During operation, SideKick components get sufficiently hot to cause combustion and severe burns! Never touch the ceramic heater or surrounding metal. Always allow a cool-down before touching any inner SideKick components after turning the device off.
• Keep the SideKick out of reach of children and away from pets. Never leave unattended with a child in the vicinity.
• Keep the SideKick away from combustibles such as paper, fabric, plastic and anything else you think could catch fire.
• Never let hair or loose clothing come in contact with the heat source.
Cleaning the SideKick Portable Vehicle
We know how much of a hassle it can be to clean most portable vaporizers,
so we have designed the SideKick to be simple and effortless to take apart for a good cleaning.
How To Disassemble The SideKick For Cleaning
- First, take off the top with the built-in stir tool and the bottom battery cover. Remove the batteries and set the side aside.

- For the top part with the stir tool and screen, follow these steps:
- Use the screwdriver that comes with your SideKick to unscrew the screw. Hold the stirring gear tightly as you loosen or tighten the screw.

- Next, pull the mouthpiece all the way out.
- Then, remove the silicone vapor path connector.

- Use a pick or the screwdriver to push down on the vortex cooler from the top. It will slide out of the bottom. This will clean the vapor path tube and remove residue.

- Finally, use a pick to remove the silicone plug on the front, just below the air intake holes.

- Use the brush that comes with your SideKick to brush away debris from the SideKick and its parts.
- Put the top lid, screen, stir tool, vortex cooler, and mouthpiece in a bowl with alcohol or a cleaner from our site. Let them soak for an hour, then wipe them dry with a rag or paper towel. Let them dry completely before putting them back together.
- While the other parts soak, clean the silicone pieces, bottom lid, ceramic bowl, and housing with a damp rag or paper towel. Don't soak silicone in alcohol for too long, as it can warp it. But a small amount of alcohol is okay if it dries quickly.
- To clean the vapor path tubes, dip the round brush in alcohol and wipe them from both the top and bottom.
- Once everything is clean and dry, put it all back together as you took it apart.
- Never take the screw out of the back of the unit. It's hard to get the internals out. Don't remove this screw.

Changing the Screen
Changing the screen is as simple as unscrewing the screw holding it to the top lid. Hold the lid and stir gear in one hand, then with the other hand hold the screwdriver and remove the screw.
Watch the video below to see exactly how it's done:
What's In The Bag?
- SideKick Portable Vaporizer with Stir Mechanism and Vortex Cooler
- American Hand-made Glass Mouthpiece
- 1 Rechargeable 18650 Batteries (may or may not look like the battery in images)
- Cleaning Brush with Alcohol Cleaning Pads
- Small Phillips Screwdriver
- Stainless Steel Marble Pick
- Small Bowl Tongs/Scoop
- Coconut Oil Lubricant
TIPS & HINTS
- Start with a low temperature setting of about 5-6 for dry herbs and 10-11 for oils. If you don't see vapor, turn it up a bit. Wait 5-10 seconds and try again. Keep going until you see vapors on exhale.
- If the flow seems restricted:
- This might happen after lots of use with dry herbs. To fix, remove the lid a little and blow in the mouthpiece. This clears out any particles caught in the vortex cooler.
- Another fix is to remove the vortex cooler and clean it.
- For an easy draw, use the SideKick without the vortex cooler. This will increase vapor flow a lot.
- Screens can get clogged, causing airflow issues. Clean or replace your screen often to keep airflow good. We suggest using your brush after each use.
- Running the SideKick at higher temp:
- There's no need to go to 11 unless you want fast heat for your herbs or oils. If you do, turn it down soon to avoid burning your herbs or oils.
- Some like to run their SideKick at 8+ with dry herbs. Stir your bowl well after each inhale and keep your herbs from setting too long. Be careful not to burn your herbs.
- Concerned about a rattling sound from your SideKick? Don't worry! It's just the metal buttons touching the aluminum housing. The buttons have a small travel distance before they engage. This is normal and by design!
- Running the SideKick at lower temps:
- Lower temps give great flavors for a longer time but the hits are less dense. Stir your bowl well after inhales and then tamp your SideKick lightly in your other hand to pack the bowl.
Warranty & Service
Click here to view the complete warranty details.
Register Your SideKick Portable Vehicle to Start the Warranty Period:
Your SideKick Portable Vehicle must be registered within 30 days of purchase to enact the warranty.