LSV
Life Saber Vaporizer Instruction Manual
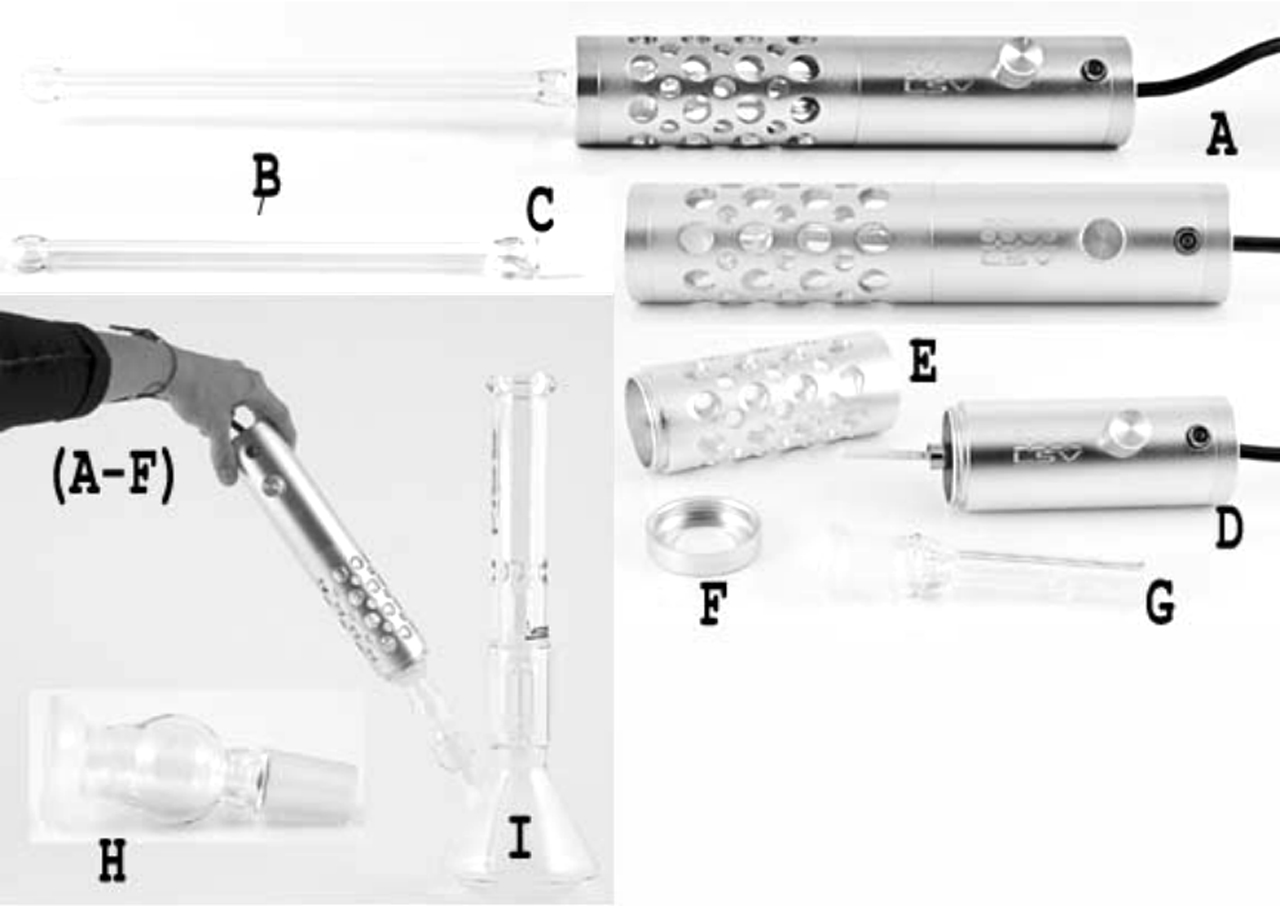
- LSV Complete Unit
- Transfer Wand
- Transfer Wand Bowl
- LSV Base Unit
- LSV Heat Shield
- LSV End Cap
- LSV Heater Cover
- LSV Water Pipe Adapter
- Example of LSV used alongside a water pipe using the LSV Water Pipe Adapter
How it Works
Briefly, the vaporizer allows a person to inhale essential ingredients from herbal material without the use of fire. The LSV uses hot air to warm the plant matter until active ingredients are heated high enough to boil, vaporize, and be absorbed by the air. Instead of using fire to burn the ingredients out of the plant matter, our product releases the ingredients quickly and efficiently through vaporization without ingredient loss, tar, and odors associated with smoking.
The glass transfer is packed lightly, not more than 3/4 full, or around ½-3/4of an inch. As soon as the transfer is connected with the heating element of the vaporizer, the user inhales instant vapor through the transfer. Vapor goes into the transfer almost clear to light white and is exhaled as a cloud of white mist. Your lungs' health remains intact as they are not inhaling the plant ash and tar created from the combustion of smoking. The standard size transfer offers about 3-7 big inhales before the herbal material becomes brown. Stir it up and try again repeating the stir technique until vapor becomes little to none. The user blows through the transfer into a container or trash receptacle to expel the spent herbal matter.
Instructions - Standard
Getting the right vapor draw is a science. LSV owners learn their machine after a few practice sessions. Get used to packing small amounts, fluffed up slightly. We recommend the following procedure:
- Turn on the unit to a somewhat high level to heat up the unit. The unit should be left on a high heat for about 2 minutes before being turned down to the preferred heat for use for faster heat up. Or you can turn it to your desired location (roughly ¾ full power) for about 2-3 minutes and it should be ready to vaporize!
- Turn the LSV's power back about 1/4-1/2 the full power and the unit should be ready to use. For the first use, you should try a lower setting and gradually turn the LSV up until vaporization occurs. This will ensure that you do not have the LSV turned up too high and catch your herbal matter on fire. This is what you want to avoid! After some use, you will be able to find a perfect setting for the LSV. If your materials turns very dark brown or black, the temperature is up too high or you are inhaling too slow and combustion is occurring, not vaporization. Turn the LSV down or inhale faster to solve this issue. You will learn it!
- Grind up your herbs while the unit is heating. You can use a grinder, knife or fingers, but make sure that the material is broken up. We recommend using a grinder that you can get on our website if you do not already have one.
-
Place your herbs into the bowl on the glass transfer. You can accomplish this by using your fingers and putting it in or vacuuming up the ground herb through the transfer like in figure 1. Do not fill the wand too much (1/4-3/4 full is the maximum you want to put in).
NOTE: You do not need to use much material here. 1/2 of an inch is a good amount to start with, as you are learning how to use your LSV. Stir your herb occasionally after inhaling to ensure that the maximum amount of surface area of your herb is exposed to the hot air. This will help you get the most out of your herb as you vaporize.
-
Invert the LSV to insert the loaded transfer into the heater cover. Then turn the LSV around to be able to use and inhale a full breath (draw). When you exhale, you should see a white mist. This ensures that you have the heat set to the right temperature, if you do not see white mist, try again by inhaling slower or increasing the heat. Use caution when increasing the temperature, the element can get hot enough to burn your material. Remember that getting to the right heat setting and inhaling the proper draw takes time, and you will learn as you go.
NOTE: Be sure not to inhale too slow as this will cause the material to burn and possibly catch fire.

Instructions - Flameless lighter
- Remove the top two portions of the vaporizer (the cap and heat shield). Remove the glass heater cover gently so as not to cause possible breakage. Turn on the vaporizer and allow it to heat up as instructed with traditional use only here you can turn it up all the way.
- Place glowing ceramic heater about ¼ inch above and parallel to the herbal matter.
- After use turn the unit off and replace only the top (the cap and heat shield). Do not replace the glass heater cover at this time as the unit is still very hot and could burn you very seriously! After the unit has cooled down to room temperature (about 30 minutes) you can replace the glass heater cover.
Instructions - Water Pipe & LSV
- Remove the top cap portion of the vaporizer. Do not take the glass heater cover off. Turn on the vaporizer and allow it to heat up as instructed with traditional use.
- Place your ground herbal material in the LSV water pipe adapter bowl. Fill your favorite water filter with water and ice. You must have a ground glass downstem for the LSV water pipe adapter to work. Then place your LSV water pipe adapter in your water filter. Invert your LSV and place on top of the LSV water pipe adapter and inhale.
- After use turn the unit off and replace the cap.
REPLACING THE SCREEN
Some day you will need to replace your screen. After a little practice this can be a very easy process. The first thing is to remove the screen from the transfer. This is easily removed by taking the supplied pick and just prying it out. To put in your new screen, go ahead and push in the screen, so that it goes in the front of the transfer. Push it down towards the end of the ground glass part. When the screen hits the bottom of the hour glass part, you will want to flip the screen. This will cause the bottom part of the screen to catch in the lip of the glass. Then push the other side down into place and the screen will pop in.
